How to Edit YouTube Videos: Step by Step From Footage to Upload
The exact order to edit a YouTube video, from organizing footage to the rough cut, audio, color, captions and export, with free software picks and YouTube's current upload specs.
On this page
To edit a YouTube video, organize your footage and build a rough cut that tells the story. Then tighten the pacing, add B-roll and graphics, fix audio, color and captions, and export at the resolution you filmed. Free editors such as DaVinci Resolve, iMovie and CapCut handle every one of these steps.
Most beginners spend their editing time in the wrong place. Tutorials show transitions, LUTs and effects, but what keeps people watching gets decided in the rough cut: which takes you keep, how fast you get to the point, and every pause you delete. Get the structure right first and the polish takes a fraction of the time.
Which software should you use to edit YouTube videos?
Pick the simplest editor that does what your videos need today. Switching later is easy, because the skills (cutting, pacing, audio levels) carry over between all of them.
| Editor | Price | Runs on | Best for |
|---|---|---|---|
| iMovie | Free | Mac, iPhone, iPad | First videos and simple talking-head edits |
| DaVinci Resolve | Free version; paid Studio version | Windows, Mac, Linux | Pro color and audio tools at no cost |
| CapCut | Free tier with 1080p export; paid plans for premium features | Phone, desktop, browser | Fast edits, auto-captions, Shorts |
| Final Cut Pro | Paid | Mac | Mac users who outgrow iMovie |
| Premiere Pro | Subscription | Windows, Mac | Long projects, teams, Adobe workflows |
| Revid | Free sign-up with free credits to try; paid plans from $39/month | Browser | Auto-editing talking videos, captions, AI visuals, publishing to YouTube |
iMovie and Final Cut Pro are made by Apple, and Premiere Pro comes from Adobe. A quick way to decide:
- If you film on a phone and mostly post short videos, start with CapCut or iMovie.
- If you want professional color and audio tools without paying, start with DaVinci Resolve.
- If you already pay for Adobe apps or edit with a team, use Premiere Pro.
- If you record talking videos and want the cutting, captions and graphics done for you, use an AI editor (see the Revid section below).
For market context on these tools, SendShort's video editing software statistics and LLCBuddy's roundup of video editing statistics collect figures from other reports. Both are secondary aggregators, so trace any number back to its original source before you quote it.
Editing terms you will see in every editor
- Timeline: the workspace where you arrange clips, audio and graphics in order.
- A-roll and B-roll: A-roll is your main footage (usually you talking); B-roll is the supporting footage you cut to while the A-roll audio keeps playing.
- Rough cut and fine cut: the rough cut puts the story in order; the fine cut trims every clip to the frame.
- J-cut and L-cut: the next clip's audio starts before its picture (J), or the current clip's audio continues over the next picture (L).
- Render or export: turning your project into one finished video file.
How to edit a YouTube video, step by step
Work in this order. Each step builds on the one before it. If you grade color or add effects before the structure is locked, you redo that work every time you move a clip.
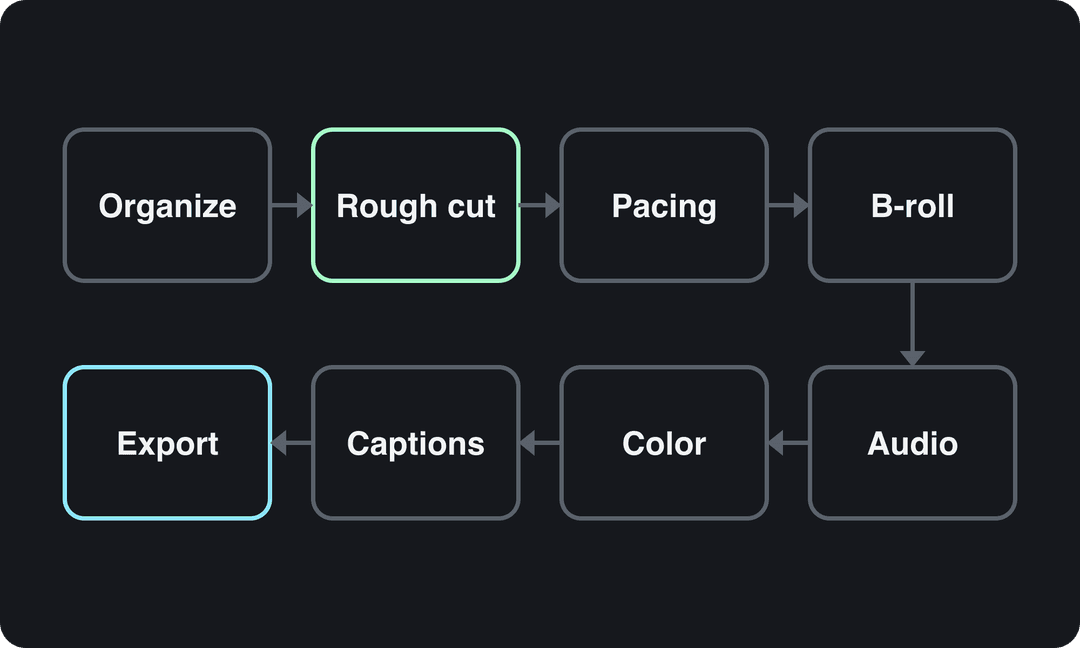
Organize your footage
Create one project folder per video with subfolders for Raw, Audio, Graphics and Exports. Rename clips with a consistent pattern such as ProjectName_Date_Scene so you can find any take in seconds. Keep a backup on an external drive and another in cloud storage before you delete anything from the camera or phone.
If you shot in 4K on an older computer, let your editor create proxies (lightweight copies used only while editing). DaVinci Resolve, Premiere Pro and Final Cut Pro all do this, and playback stops stuttering.
Build the rough cut
Put your A-roll on the timeline in script order and keep only the best take of each line. Do not add music, effects or color yet. Then watch the whole thing at normal speed and cut any section that does not move the video forward, even if it took an hour to film.
If your editor supports text-based editing, you can delete words from the transcript and the matching video is removed. On interview and talking-head videos, it is the fastest way to get a rough cut.
Tighten the pacing
Now go line by line:
- Cut breaths, filler words and false starts with jump cuts.
- Hide jump cuts with a punch-in: zoom the same shot in slightly. If you filmed in 4K and export in 1080p, the zoom costs no visible quality.
- Use J-cuts and L-cuts between sections so the audio pulls viewers into the next shot instead of stopping dead.
- Cut on action (a hand moving, a head turning) so the change of shot feels natural.
- Whenever energy drops, change something on screen: a new angle, B-roll, a zoom or on-screen text.
Add B-roll, text and graphics
Add B-roll every time you mention something viewers could see: the product, the place, the screen you are describing. Put key numbers and names on screen as text, and use lower thirds to introduce people. Animated callouts work well for explainers, and a motion graphics generator can produce them without After Effects skills.
The rule for effects: each one should clarify or emphasize something, never decorate. Default to straight cuts and pick 2 or 3 signature transitions you reuse, so they read as your style rather than noise. Revid's AI VFX Editor watches your footage and adds the effect you describe at the right moment, which saves keyframing by hand.
If you film on a green screen, light the screen evenly and keep yourself a few steps away from it. Uneven light and green spill on your shoulders cause most bad chroma keys.
Fix the audio
Viewers will sit through soft footage, but they leave over bad sound. Work through this list:
- Clean: remove steady background noise with the noise reduction in Audacity (free) or Adobe Audition. Sample a few seconds of room tone, then apply the reduction gently so your voice does not sound robotic.
- EQ: use a high-pass filter to remove low rumble, then a small cut in the muddy low mids if your voice sounds boomy.
- Even out: compress and normalize the dialogue so quiet and loud lines sit at a similar level.
- Music: keep the music clearly below the voice. Lower it until you can follow every word with your eyes closed, and duck it further under speech (most editors have auto-ducking). Avoid songs with vocals under talking.
- Check: make sure no peaks hit the red (clipping), audio is in sync with lips, and the mix sounds right on both a phone speaker and headphones.
Use music from the YouTube Audio Library or tracks you have licensed. A copyrighted song can trigger a Content ID claim that sends the video's ad revenue to the rights holder. If your recordings are noisy to begin with, Revid's AI audio enhancer cleans up the sound before you start mixing.
Correct, then grade, the color
Color correction comes first: fix white balance and exposure so skin looks natural and every camera angle matches. Grading comes second: apply a consistent look (warmer, cooler, more contrast) across the whole video.
Judge with scopes rather than your eyes. Use the waveform for exposure and the vectorscope for skin tones, because an uncalibrated laptop screen will mislead you. Save your grade as a preset or LUT so every video on the channel looks like it belongs together.
Add captions
YouTube generates automatic captions, but they miss names, brands and jargon. Edit them in YouTube Studio or upload your own caption file on long videos. For Shorts and clips, burn styled captions into the video itself so they show up for people scrolling with sound off. Revid's AI caption generator creates synced captions in 100+ languages.
Export and upload
Export an MP4 with H.264 video and AAC audio, at the same resolution and frame rate you filmed (1080p or 4K for most cameras and phones). Exporting at a higher frame rate than you shot adds file size, not smoothness. If your editor asks for a bitrate, YouTube Help's page on recommended upload encoding settings lists the current values.
By default, YouTube uploads are limited to 15 minutes, and you need a verified account to upload longer videos. The maximum upload is 256 GB or 12 hours, whichever comes first.
Before you publish:
- Title: up to 100 characters, with the main promise near the start.
- Description: up to 5,000 characters; add timestamps to split the video into chapters.
- Thumbnail: YouTube recommends 3840x2160 (16:9, minimum width 640 px). Files can be up to 50 MB on desktop but only 2 MB on mobile, and custom thumbnails require a verified account.
- Test: on desktop, YouTube Studio can A/B test up to 3 titles and thumbnails and shows every viewer the variant with the highest watch time. Shorts are not eligible.
Kasra Design's collection of YouTube statistics and trends gives a feel for how much video competes for each click, which is why the thumbnail deserves as much care as any edit.
If you added realistic AI-generated or AI-altered scenes, turn on the "AI use" disclosure in YouTube Studio. AI-written scripts, captions and cloning your own voice for voice-overs do not need it. Since May 2026, YouTube automatically labels undisclosed videos with significant photorealistic AI. Disclosing does not by itself limit reach or earnings.
How to edit the opening so viewers keep watching
The opening is where most edits lose people, and it is the easiest part to fix:
- Delete the greeting, the channel intro bumper and "before we start" asides.
- Open on the result, the question or the most interesting shot you have, then say in one sentence what the video covers.
- Show proof early: the finished build, the before and after, the number you promised in the title.
- Match the thumbnail and title. If the first shot does not deliver what the thumbnail promised, viewers leave.
Then check the audience retention graph for the video in YouTube Studio analytics. A steep drop at the start means the opening is too slow. A dip in the middle points to a section you should cut shorter next time, and a bump means people rewatched something, so do more of it.
Prompt to try
Make a 30-second vertical YouTube Short titled "3 editing mistakes that make your videos look amateur". Open on a jarring star-wipe transition with the hook "Stop doing this in your edits." Keep narration to short lines, let bold on-screen text and before/after editing clips carry each mistake, and end on a clean straight cut.
How to edit YouTube Shorts
A vertical or square video up to 3 minutes long uploaded on or after October 15, 2024 is classified as a Short. Edit in a 9:16 project from the start instead of cropping a 16:9 export, and keep captions and key text out of the areas covered by the title, buttons and channel name. A YouTube Shorts safe zone template shows exactly where those are.
Shorts reward fewer words and stronger visuals. In Revid's analysis of 176,367 TikToks with 1,000+ likes posted between October 2025 and October 2026, videos with under 40 characters of speech had a median of 123K views, and 20.2% passed 1M views. Videos that talk throughout (300+ characters of speech) had 68K and 11.9%. This is TikTok data, not YouTube, and the sample only includes videos that already reached 1,000+ likes, so it shows what successful videos have in common rather than proving cause. The editing lesson still transfers: in a Short, let visuals and on-screen text carry what a voice-over would only repeat. The method is in Revid's study of what makes a TikTok go viral.
Videos with just a few spoken words (a line or two) beat both silent videos and videos that talk the whole way through, which were the most common and the weakest.
Source: Revid analysis of 176,367 TikToks analyzed by AI, with 1,000+ likes posted between Oct 1, 2025 and Oct 16, 2026 (61,203 creators)
Show the data
| Median views | Share that passed 1M views | |
|---|---|---|
| No speech | 73.3K | 14.3% |
| Under 40 | 122.7K | 20.2% |
| 40 to 120 | 97.2K | 17.6% |
| 120 to 300 | 91.6K | 16.8% |
| 300+ | 67.7K | 11.9% |
More Shorts specifics:
- Music: most Shorts Audio Library songs can be used for up to 90 seconds in a 3-minute Short; some tracks are limited to 60 or 30 seconds.
- Thumbnails: verified accounts can upload a custom Shorts thumbnail in YouTube Studio on a computer. YouTube recommends 9:16 at 2160x3840, with a minimum height of 640 px.
- From long videos: a YouTube clip maker turns a long video into vertical clips, which you then tighten with the same pacing rules as above.
How to edit a YouTube video with Revid
If you record talking videos, Revid's auto edit video tool handles the rough cut and graphics for you:
- Upload your talking video or paste a link. It comes back edited, with your key lines turned into motion graphics.
- Open the result in Revid's timeline editor to change any cut, text or scene.
- Add synced captions in one of 30 caption styles, or an AI voice-over in 70+ languages.
- Export in 720p, 1080p or 4K at 30 or 60 fps, or publish straight to YouTube (and TikTok and Instagram) from the same queue.
Sign-up is free and new accounts get free credits to try video creation, no credit card needed. Regular creation then uses the credits of a paid plan, starting at $39/month. If you mainly want to cut your own footage by hand with no AI generation, a classic editor fits better; this Revid vs CapCut comparison lays out the difference.
Build an editing workflow you can repeat every week
Publishing consistently depends less on editing speed than on not rebuilding the same things every week:
- Project template: save a project with your intro card, lower thirds, end screen layout and audio track structure, and duplicate it for each new video.
- Presets: save your color grade, audio chain (noise reduction, EQ, compression) and caption style as presets.
- Batching: edit two or three videos in one session; your hands remember the shortcuts and the decisions get faster.
- Tracking: a board with columns such as Script, Filmed, Editing, Review and Scheduled in Trello or Asana shows where every video stands, especially once an editor or thumbnail designer joins.
Editing mistakes that make videos look amateur
- Effects and transitions on every cut instead of straight cuts with a purpose.
- Music that competes with the voice, or songs with lyrics under talking.
- A long intro before the video delivers anything.
- Minutes of talking head with no B-roll, text or change of framing.
- Shots from two cameras that do not match in color.
- Never opening the retention graph, so the same mistakes repeat.
For more beginner habits, see these video editing tips for beginners.
FAQ
Can you edit a YouTube video after you upload it?
Yes, within limits. YouTube Studio's built-in editor lets you trim sections, blur parts of the frame and add audio after upload without changing the video's URL. For anything bigger, re-edit in your software and upload a new version.
How long does it take to edit a YouTube video?
It depends more on style than on length. A talking-head video with straight cuts edits far faster than one with B-roll on every line and custom graphics. Time your next few edits per finished minute: templates, presets and auto-editing tools are what bring that number down.
Can you edit YouTube videos on your phone?
Yes. CapCut and iMovie both run on phones and are enough for Shorts and simple vlogs. Move to a desktop editor when you need several audio tracks, color scopes or long timelines.
Is free editing software good enough for YouTube?
Yes. DaVinci Resolve's free version includes professional color and audio tools, and plenty of channels publish with iMovie or CapCut. Your cutting and pacing decisions matter far more than the price of the software.