Instagram Video Formats: The Complete 2026 Spec Guide
Master Instagram video formats with our 2026 spec guide. Get exact dimensions, aspect ratios, codecs, and export settings for Reels, Stories, and Feed.
On this page
You've finished the edit, checked the color, and watched the final file twice. Then Instagram crops the speaker's face, hides the headline under its interface, or turns clean motion into a blocky, pixelated blur. The problem usually isn't the footage. It's a mismatch between the way the video was mastered and the placement where people will watch it.
Instagram video formats aren't interchangeable deliverables. Reels and Stories expect full-screen vertical composition, while feed video supports portrait, square, and horizontal layouts. A reliable workflow starts with the publishing goal, then builds the correct composition, safe areas, and export file for that destination.
Understanding the Evolution of Instagram Video Formats
Instagram's current format complexity has a clear origin. The platform started as a primarily photo-based network, then gradually added video placements that changed how creators needed to shoot, edit, and package content.
On June 20, 2013, Instagram introduced video sharing, allowing users to record and publish clips of up to 15 seconds, with filters available in the original experience. Stories arrived in August 2016, giving users a temporary format for photos and videos that disappeared after 24 hours. Within two months, Stories reached 100 million daily users, according to this history of Instagram's transition from photo app to video platform.
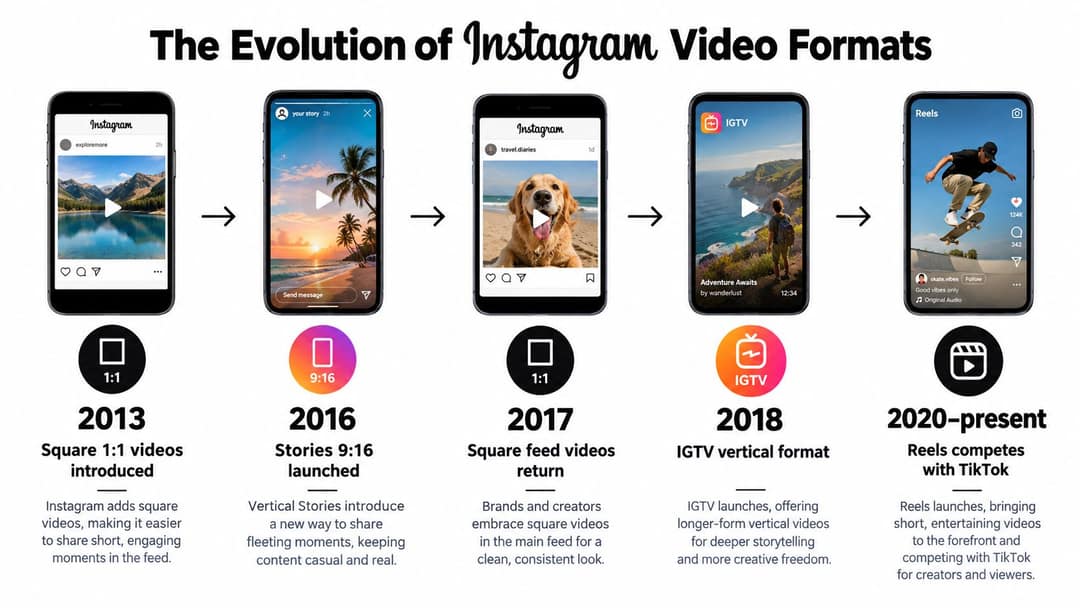
That progression matters because each format was designed around a different viewing behavior.
- Feed video gives content a more persistent home and supports portrait, square, and horizontal compositions.
- Stories create short-lived updates that appear in a dedicated strip and encourage frequent publishing.
- Live broadcasts support real-time interaction.
- Reels use short-form vertical video and algorithmic distribution to reach people beyond the creator's existing followers.
Reels arrived globally in 2020, in response to the growth of TikTok. The format expanded Instagram's role from a network where people mainly followed accounts they already knew into a platform that could recommend short videos based on viewing behavior and content interest.
Why one master file fails
A 9:16 edit can fill a phone screen in Stories or the dedicated Reels experience, but it may be cropped or previewed differently in the feed and profile grid. A square edit can look orderly in a grid, yet leave valuable screen space unused during mobile feed browsing. A widescreen interview may preserve the original camera framing, but it needs a different composition if the same material becomes a vertical Reel.
The mistake is treating resizing as mastering. Resizing changes the dimensions. Mastering changes the framing, text placement, pacing, and visual hierarchy for a specific placement.
Practical rule: Keep one high-quality source project, but create separate platform compositions from it. Don't ask a single crop to serve every Instagram placement.
Instagram's history also explains why teams now need an asset portfolio rather than one universal export. The original video limit was later expanded, Stories developed from shorter clips into segments of up to 60 seconds, and Reels moved beyond their initial 15-second limit. The formats evolved because users don't consume an update, a discovery clip, and an in-depth explanation in the same way.
For production teams, the useful conclusion is simple. Plan the message first, then decide whether the audience should discover it in Reels, follow up through Stories, or spend more time with a feed asset. Technical specifications are only effective when they support that behavior.
Mastering Instagram Reels Specifications and Safe Zones
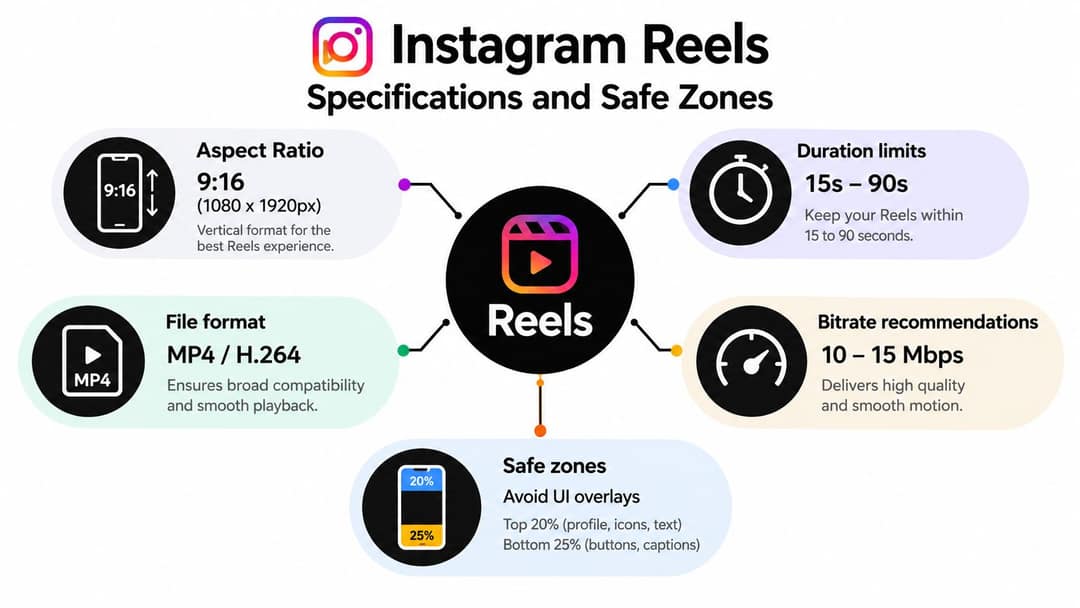
Reels are built for 9:16 vertical video, with 1080 × 1920 pixels as the practical production canvas. That frame is intended to fill a smartphone display, so horizontal source footage requires deliberate reframing rather than a last-minute crop.
The format also has a distribution advantage. Reels can appear in the feed, Explore, and a dedicated Reels area, which gives them a discovery role beyond an account's current followers. The technical setup should therefore protect the first impression in several contexts, not only in the full-screen viewer.
Build the vertical canvas before editing
Create the sequence at 1080 × 1920 pixels and compose for a portrait screen from the first cut. If the source is an interview, keep the speaker's eyes and mouth near the visual center. If the source is product footage, leave enough room for the object to remain visible after Instagram adds account information, captions, and engagement controls.
A practical Reels export uses an MP4 container, H.264 video, progressive scanning, square pixels, a fixed frame rate, and AAC stereo audio. A target of at least 128 kbps is a sensible audio baseline for speech, music, and sound effects. These settings are documented in this Instagram export specification guide.
Map the safe area by function
Instagram's interface can cover content near the top, bottom, and right side of the vertical frame. The exact overlay can vary by viewing context and device, so don't treat the visible canvas as an empty rectangle.
Use this working map:
- Central message area: Put the headline, speaker's face, product detail, or demonstration in the middle of the frame. This is the most dependable region across full-screen viewing, feed previews, and profile surfaces.
- Right-side clearance: Keep text, logos, and small interface-like icons away from the far right edge, where engagement controls can compete for attention.
- Lower clearance: Don't place subtitles, pricing language, or a call to action at the very bottom. Captions and account information can occupy that region.
- Upper clearance: Keep important words below the top interface elements, including account and navigation information.
- Profile-grid check: Preview the center crop separately. A Reel can look correct full-screen but lose its subject when the profile grid uses a tighter preview.
Large captions should be short enough to read quickly and placed where the background gives them contrast. If the text needs a heavy outline or multiple lines to remain legible, the composition probably needs more empty space.
Review the upload in every relevant view
Before publishing, inspect the rendered file on a phone. Check the opening frame, the first caption, the speaker's face, the lower call to action, and the final frame. Don't rely only on an editing application's safe-margin guides because Instagram's interface is layered on after export.
Teams that need to inspect or archive reference clips can use an Instagram Reels download tool, provided they have the right to save and reuse the material. For production planning, keep the technical decisions separate from the creative reference. A downloaded clip can show pacing and framing, but it shouldn't be treated as permission to copy another creator's work.
For a deeper specification reference, see this Instagram Reels dimensions guide. The central production principle remains unchanged: compose for the vertical screen, then protect the visual information that Instagram's overlays are most likely to cover.
Optimizing Instagram Feed Video Dimensions and Aspect Ratios
A feed video can look polished in the editor and still feel cramped, cropped, or unreadable after upload. The common cause is a single master file being sent to every placement without checking how Instagram reshapes the frame. Choose the feed format according to the viewing goal first, then build the crop and overlay treatment around that decision.
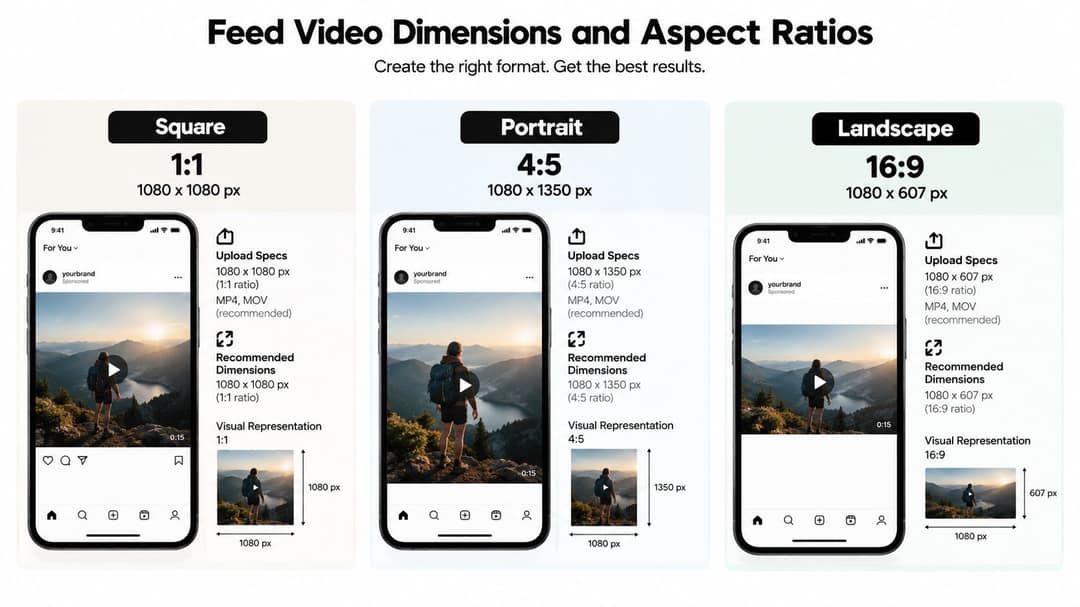
Feed video supports 4:5 portrait, 1:1 square, and 1.91:1 horizontal compositions. Their practical specifications and crop behavior are summarized in this Instagram video size and aspect-ratio reference.
Use 4:5 when reach is the priority
A portrait feed asset at 1080 × 1350 pixels occupies more vertical feed space than a square or horizontal post. That extra coverage can help a face, product, or opening text hook hold attention during scrolling. It also gives an automated cropping workflow more useful pixels to preserve around the subject.
The trade-off is a dedicated reframing pass. A speaker who sits comfortably in a wide edit may shift too far to one side after conversion. Product shots can lose edges, labels, or demonstrations unless the editor adjusts the camera move, tightens the crop, or extends the background.
For product explainers, tutorials, and demonstrations, 4:5 is usually the strongest starting point when reach matters. Keep the main subject inside a central safe area, and place captions away from the lower controls and the account or interaction elements that may sit over the feed video. A template can enforce these boundaries before an AI tool generates or resizes the file.
Reserve 1:1 for square sets and retention
A square file at 1080 × 1080 pixels works well when a video appears beside square carousel assets or when a series uses a consistent square look in the feed. Since January 2025, though, Instagram's profile grid shows vertical rectangles instead of squares, so a square video is cropped at the sides in the grid. Keep the subject and any title text centered so the grid thumbnail still identifies the video.
The format gives up vertical space. Standing presenters, tall products, subtitles, and demonstrations may need a smaller subject scale or shorter text lines. Use it when a consistent square look in the feed and quick recognition matter more than maximum feed coverage.
Use 1.91:1 horizontal only when the frame carries meaning
Horizontal video can preserve a wide interview, group scene, location, or screen recording that would lose meaning after a tighter crop. It offers less mobile-screen coverage than portrait feed video, so the first frame, subject placement, and headline need to communicate quickly.
Create separate variants rather than placing a 9:16 file inside a feed post and relying on an automatic conversion. For AI-assisted workflows, provide the source aspect ratio, focal subject, caption bounds, and required output before rendering. Then review the result for:
- Subject framing: Keep the face, product, or action inside the selected crop.
- Text placement: Add captions within the final frame, not before an automated resize.
- UI clearance: Leave practical space around lower and side overlays, while keeping key information readable.
- Grid preview: Make sure the center still identifies the subject at a small profile size.
- Playback quality: Test fine detail, gradients, and fast movement after Instagram processes the upload.
A goal-based feed strategy may produce three exports from one concept. The 4:5 version favors reach, the square version fits square carousel sets, and the horizontal version protects a wide visual story. They are separate editorial decisions, not duplicate files.
Navigating Instagram Stories Video Requirements and Limits
Stories are designed for quick, timely communication rather than permanent presentation. The format appears in a dedicated strip, disappears after 24 hours, and supports repeated daily publishing. That makes a Story useful for a launch reminder, behind-the-scenes update, poll prompt, or follow-up to a Reel.
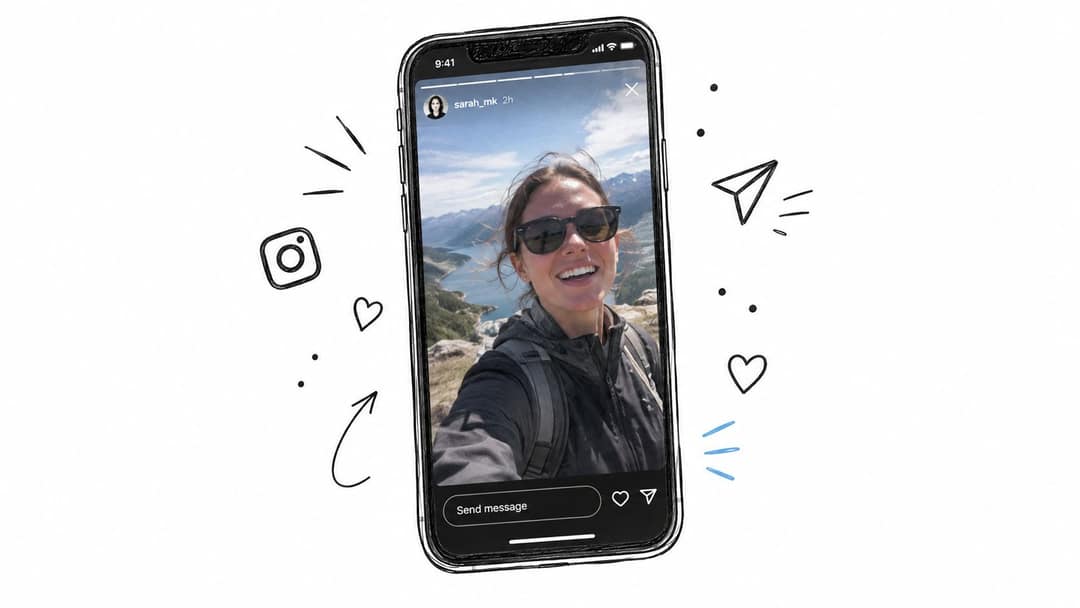
Stories use the same practical vertical canvas as Reels, 9:16 at 1080 × 1920 pixels, but the editorial rhythm differs. Each Story segment can run for up to 60 seconds, so a longer explanation needs to be planned as a sequence rather than forced into one uninterrupted file.
Design the sequence before exporting
A useful sequence usually gives each segment one job:
- Opening segment: State the situation or tension immediately. Don't spend the first frame on a logo animation.
- Middle segment: Demonstrate the process, answer the objection, or show the product in use.
- Interaction segment: Leave room for a poll, question, link, or other interactive element.
- Closing segment: Give one clear next action, such as visiting a product page, replying to a question, or watching the related Reel.
The progress bars at the top tell viewers that more segments are coming. Use that expectation instead of repeating the entire setup in every clip. Each segment should make sense on its own, but the sequence should also create a reason to continue.
Prompt to try
Create a 30-second vertical 9:16 Instagram Reel announcing a weekend bakery launch. Open with the hook "Our sourdough sells out by 10am, here's how to get yours", show warm close-ups of fresh bread, and end with one clear next step: tap the link in bio. Keep captions short and centered, away from the top and bottom edges.
Keep interaction zones clear
Stories place interface elements over the image. Leave space near the top for progress indicators and account information, and keep important words away from the lower region where replies, links, and other controls may appear.
Place stickers and calls to action only after the core composition works without them. A common failure is designing a clean lower-third, then adding an interactive element directly over the speaker's subtitle. The result is technically functional but difficult to read.
Raw footage can work well here because the placement rewards immediacy. That doesn't mean careless footage works. Fix exposure, remove distracting pauses, normalize dialogue, and use captions that remain readable on a small phone screen. Stories feel personal when they're timely and direct, not when they're visibly unfinished.
Choosing the Right Format for Your Content Goals
Pixel dimensions answer only one question. The better question is what the viewer should do after watching.
Reach, engagement, retention, and conversion intent can point to different formats. Reels are designed for discovery and can be distributed across the feed, Explore, and a dedicated Reels area. Stories are suited to timely updates and repeated publishing. Feed video gives educators and businesses more room for explanation, while a video carousel can divide a topic into several deliberate steps.
Available 2025 evidence is contradictory. One analysis reports that Reels generated 67% more engagement than standard feed video and 1.9 times the reach for accounts below 50,000 followers, while another benchmark reports carousels outperforming Reels on engagement, with carousel engagement at 0.55% compared with 0.50% for Reels. Those figures appear together in this comparison of Instagram video and carousel performance, and they point to a useful conclusion: there isn't one universally superior format.
Start with the publishing objective
Use the format as a decision about distribution and viewer behavior, not as a default export preset.
| Primary goal | Best format | Secondary format | Key metric to track |
|---|---|---|---|
| Reach people who don't already follow the account | Reels | Feed video or Stories follow-up | Non-follower reach and shares |
| Explain a product or process | 4:5 feed video | Reel introducing the problem | Completion and profile actions |
| Build familiarity through frequent updates | Stories | Short Reel recap | Replies, sticker interactions, and exits |
| Teach a structured topic | Feed video or video carousel | Reel with the central lesson | Saves and completion |
| Drive action after awareness | Reel with a clear hook | Story sequence with a direct prompt | Profile visits and conversion actions |
Match format to information density
A short Reel can isolate the sharpest insight from a longer explanation. That makes it a strong entry point for a tutorial, but it may not provide enough context for someone ready to compare options. A feed asset can carry the deeper explanation, screenshots, product details, or step-by-step demonstration that the Reel intentionally leaves out.
For an educator, the combination might be a Reel that frames a misconception, a feed video that explains the correction, and Stories that answer questions. For a small business, it might be a product-use Reel followed by Stories showing availability, objections, and a direct next step.
Measure the right outcome
Completion tells you whether the edit held attention. Shares often indicate that the idea has social utility, while saves can signal reference value. Replies and profile actions show a different kind of intent than passive viewing.
Don't judge a conversion-oriented Story by the same standard as a discovery Reel. A Reel may introduce the brand to new viewers, while a smaller Story audience may contain people who already understand the offer. The strongest workflow often uses multiple formats in sequence, with each one performing a different job.
Editorial test: If the viewer needs context, use the feed. If the viewer needs a reason to stop, use Reels. If the viewer needs a timely prompt, use Stories.
Universal Export Settings and Codec Recommendations
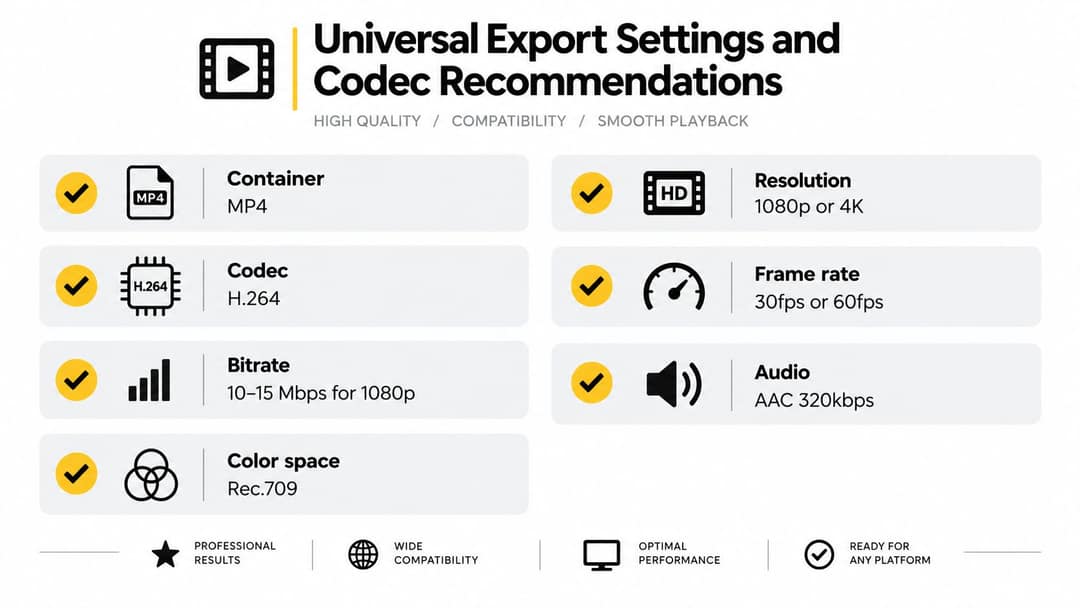
A high-resolution camera original can still produce a soft, broken-looking Instagram upload. Keep the production master separate from the file intended for delivery, then export a controlled version that gives Instagram a clean source for re-encoding.
The master should retain the highest practical quality for future edits, crops, captions, and repurposing. The delivery file should match its destination rather than forcing one oversized export across every placement. For a reach-focused vertical asset, prepare a 1080 × 1920 composition for Reels or Stories. For a portrait feed video, use 1080 × 1350. For a square feed asset, use 1080 × 1080. Never overwrite the master with a compressed social export. A later crop may need detail that the delivery file has already discarded.
Map the important content before rendering. Keep faces, products, subtitles, and calls to action inside the central viewing area, with extra clearance above and below for interface overlays. This matters more for automated reframing, where a crop can preserve the subject but place text beneath buttons or captions. If reach depends on immediate recognition, protect the subject and opening text. If retention depends on subtitles or a demonstration, give the readable content more room than decorative graphics.
Use a fixed frame rate
Variable frame rate footage can cause audio drift or timing errors after editing and upload. A fixed frame rate gives the timeline and encoder predictable timing. For feed-oriented video, 30 fps is a commonly cited Instagram-oriented baseline, with a video bitrate around 3.5 Mbps, according to this feed video specification guide.
Preserve the camera source's timing where practical instead of converting footage repeatedly between frame rates. The final export should be checked for uneven motion, duplicated frames, and dialogue that no longer matches the speaker.
Control bitrate instead of chasing maximum bitrate
A larger bitrate does not guarantee better social playback. Instagram re-encodes uploads, so an unnecessarily heavy file can add processing without preserving its extra detail. Use a controlled delivery preset and keep the high-bitrate master internally.
Test difficult material before publishing, including foliage, water, smoke, fast camera movement, and fine patterns. These scenes expose blockiness, smearing, and mosquito noise quickly. The right preset is the one that survives re-encoding cleanly, not the one with the largest file size.
Protect the audio track
AAC stereo audio provides a dependable delivery baseline. Make dialogue clear before upload, and keep music from masking the first spoken phrase or final call to action. Export a short test using the same captions, motion, and mix as the final file, then inspect the uploaded result on a phone.
That check can reveal tiny captions, harsh high frequencies, crushed shadows, or audio that feels out of sync with fast cuts. These choices reduce compatibility problems during delivery because Instagram re-encodes uploads against a known format baseline.
Automating Video Formatting with AI Workflows
Manual formatting becomes a bottleneck when one source needs a Reel, a feed version, a Story sequence, and several caption treatments. The repetitive work isn't only exporting. It includes finding the subject again, reframing every shot, checking text against interface overlays, and validating each rendered file.
An AI-assisted workflow can handle the first pass, but it still needs explicit production rules. Automation should enforce the format instead of guessing at it after the edit is complete.
Create format-specific templates
Build separate templates for:
- Reels: 9:16, 1080 × 1920, central caption area, protected top and bottom regions.
- Stories: 9:16, 1080 × 1920, segmented narrative structure, clearance for interactive elements.
- Portrait feed: 4:5, 1080 × 1350, larger lower-third area, center-safe profile preview.
- Square feed: 1:1, 1080 × 1080, consistent typography and centered framing that survives the vertical grid crop.
Each template should define the canvas, caption position, logo treatment, subtitle size, and export preset. Don't rely on a generic “resize to vertical” command. The system needs to know whether it should move the speaker, extend the background, crop the product, or reduce the text block.
Add validation before rendering
An automated pipeline should flag:
- Text that crosses the top or bottom safe area.
- Faces or products that sit too close to a crop boundary.
- Captions that exceed the available width.
- Missing audio or an unsupported export combination.
- A frame rate that changes between source and delivery.
- A composition that loses the subject in a feed or grid preview.
Caption generation also needs human review. AI can transcribe speech and place subtitles quickly, but brand names, technical terms, product names, and punctuation still need checking. A caption that is technically synchronized but visually crowded can reduce retention.
Keep humans in the editorial loop
Automation is most useful for repeatable decisions. It can identify speakers, create vertical reframes, generate captions, and produce placement-specific files. It shouldn't decide the central promise, remove necessary context, or publish a claim that hasn't been reviewed.
A practical pipeline looks like this:
- Write one source brief and identify the primary goal.
- Generate the main cut and select the destination format.
- Apply the matching safe-area template.
- Create secondary crops from the source project.
- Render MP4, H.264, AAC deliverables.
- Review captions, framing, and UI clearance on a phone.
- Publish the version whose format matches the intended viewer action.
Revid can generate vertical 9:16 Reels with AI voiceovers in 70+ languages, synced captions and AI visuals, export them at 720p, 1080p or 4K at 30 or 60 fps, and publish or schedule them directly to Instagram, TikTok and YouTube. Used correctly, that kind of tool removes repetitive formatting work while leaving the editorial decisions with the content team.
Quick Reference Cheat Sheet and Troubleshooting
Use this matrix before opening the export dialog. Choose the row by placement and viewer goal, then verify the crop and safe area in a mobile preview.
| Placement | Aspect ratio | Recommended dimensions | Duration guidance |
|---|---|---|---|
| Reels | 9:16 | 1080 × 1920 pixels | Up to 20 minutes; 3 minutes or less to be recommended to non-followers |
| Stories | 9:16 | 1080 × 1920 pixels | Up to 60 seconds per segment |
| Feed portrait | 4:5 | 1080 × 1350 pixels | Flexible feed placement |
| Feed square | 1:1 | 1080 × 1080 pixels | Flexible feed placement |
| Feed horizontal | 1.91:1 | Horizontal 1.91:1 composition | Flexible feed placement |
Fix the common failures
- Blurry or pixelated video: Match the delivery file to the destination dimensions, export with H.264, and avoid an extreme bitrate. Check high-motion shots after upload because compression often appears there first.
- Unexpected cropping: Reopen the finished video in its target ratio. Keep faces, logos, and captions inside the central safe area, especially when an automated workflow creates alternate crops.
- Captions hidden by controls: Keep key text clear of the upper, lower, and right-side interface regions. Preview every placement in Instagram rather than trusting a template alone.
- Audio drift: Use a fixed frame rate with AAC audio. Review the rendered file from start to finish before publishing.
- Washed-out color: Keep the export aligned with the project's color workflow, then compare the uploaded version on the same phone or display used for review.
- Feed grid looks awkward: Check the vertical profile-grid preview (Instagram grid thumbnails have been vertical rectangles instead of squares since January 2025) and adjust the center crop without weakening the main feed composition.
The reliable sequence is goal, placement, composition, safe area, export, mobile review. For reach, prioritize a placement that fills the screen. For retention, protect the subject, readable captions, and clean audio. Skipping one step can turn a valid file into a weak publishing asset.
Revid.ai helps social media teams create Instagram-ready vertical videos with AI-generated visuals, voiceovers, and captions. Visit revid.ai to build format-specific assets without repeating every crop and captioning task by hand.