How to Make Minecraft Animations: Step-by-Step Guide (2026)
How to make Minecraft animations for TikTok, Reels and Shorts with Mine-imator or Blender, and how to animate mobs inside Bedrock with Blockbench and animation controllers.
On this page
To make a Minecraft animation for social media, pose a Minecraft rig in Mine-imator (fastest) or Blender (most control), block the key poses, smooth the motion, render at 1080 x 1920, and add sound and captions in an editor. For mobs that animate inside the game, use Blockbench and Bedrock animation controllers.
Most beginners stall because they follow the wrong tutorial: a Bedrock resource-pack guide when they want a TikTok, or a Blender rigging course when they only need a mob to walk. Pick the workflow first and the rest gets simpler. The format is worth the effort: "Revenge," a Minecraft animation released on August 19, 2011, is listed at 284.7 million views, and "Animation Life: FULL MOVIE" (August 31, 2018) at 222.6 million, in this ranking of Minecraft animation YouTube videos.
How to make a Minecraft animation, step by step
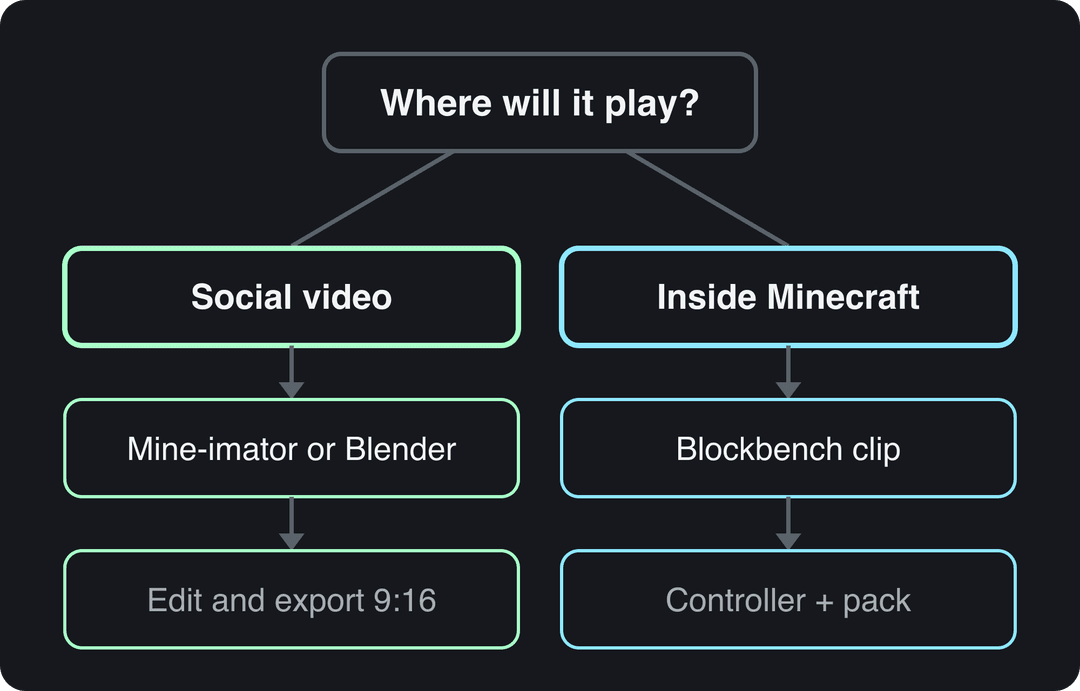
- Decide where it plays. A video for TikTok, Reels or YouTube is a rendered cinematic. A mob that moves inside the game is a Bedrock animation. They use different tools.
- Pick your tool. Mine-imator for quick Minecraft-style scenes, Blender for custom rigs and camera work, Blockbench for in-game Bedrock animations.
- Plan one short scene. Write a shot list and a rough storyboard. One 8-second scene with one character is the right first project.
- Block the key poses. Set rough keyframes for the start, the reaction, the peak and the settle, with stepped interpolation so weak poses show.
- Refine the motion. Switch to spline interpolation, fix foot contact, clean the arcs and adjust easing.
- Render for the platform. 1080 x 1920 (9:16) at 30 fps for vertical video.
- Edit and export. Add sound, captions and cuts, keep text inside the safe zone, and export an MP4.
The sections below cover each step in detail.
Cinematic video or in-game animation: pick your workflow first
If the result is a TikTok, Reel or Short, you are making a cinematic social video. You control the camera, lighting, performance, render, sound and edit, and the final deliverable is a video file.
If you want a custom mob to idle, walk or attack inside Minecraft Bedrock, you are building a functional in-game animation. The clip runs through the game's entity and resource-pack systems, and controllers decide which clip plays as the entity changes state.
| Decision | Cinematic social animation | Functional Bedrock animation |
|---|---|---|
| Primary output | Rendered video | In-game entity behavior |
| Main priorities | Acting, camera, lighting, pacing, sound | Bones, clips, controllers, transitions |
| Common tools | Mine-imator or Blender, then a video editor | Blockbench, Bedrock animation files and controllers |
| Camera control | Full and flexible | Whatever the player's view shows |
| Success test | Does the scene hold attention? | Does the entity behave correctly in-game? |
The two share skills (posing, timing, silhouettes, motion cleanup), but one does not convert into the other. A polished Blender shot is not a usable Bedrock animation, and a valid Bedrock clip is not a watchable video. A third option, recording real gameplay and editing it like footage, is machinima rather than keyframe animation; this guide covers the first two.
Which Minecraft animation maker should you use?
| Tool | Best for | Learning curve | What you get |
|---|---|---|---|
| Mine-imator | Short social clips and fan animations | Low | Minecraft-style scenes with built-in assets and a simple render |
| Blender | Cinematic shorts, custom characters, complex cameras | High | Full control of rigs, lighting, materials and compositing |
| Blockbench | Bedrock mobs and add-ons | Medium | Models and animation files that run in the game |
| Revid | Minecraft story videos without keyframing | Low | An AI-generated video with voice-over, captions and music |
Decision rules:
- If you want to post something this week, use Mine-imator and spend your time on staging and editing.
- If the shot depends on a custom rig, unusual deformation, detailed lighting or a complex camera move, use Blender. It is free, but expect to spend time importing models and waiting on renders.
- If the animation must run in Bedrock, use Blockbench and learn the controller system (covered below).
- If you need a steady stream of narrated Minecraft-style videos, an AI generator is faster than keyframing every scene.
Pick the simplest tool that can produce the shot you want. Complexity only helps when it changes the result.
Plan the scene before you animate
A short scene starts as a small production document. Take one idea: Steve hears a creeper behind him, turns sharply, sees it and freezes. It has a cause, a reaction and a payoff, and it needs no village or battle.
Prompt to try
Make a 20-second vertical Minecraft story video: Steve walks through a quiet forest at dusk, hears a creeper hiss behind him, turns sharply and freezes as it starts to flash. Open on the hiss as the hook, use tense short narration in blocky Minecraft style, and end on the reveal as a cliffhanger.
Write a four-shot list
- Establish. A wide shot of Steve walking, with empty screen space behind him.
- Trigger. The hiss starts; cut or push closer so the audience has a reason to look.
- Turn. The head and upper body lead, then the hips and feet follow.
- Reveal. A medium or close shot of the creeper and Steve's frozen pose.
Film or find reference video of a real person turning toward a sound. You are not copying it; you are extracting the timing and weight shifts that survive Minecraft's blocky proportions. Then sketch a thumbnail storyboard (boxes and arrows are enough) marking camera direction, eyeline and the frame where the threat becomes clear. If you cannot say what a shot adds, cut it.
Lock delivery and file structure early
Choose the platform before you build the scene: vertical video needs different staging than a landscape YouTube upload. Set aspect ratio, resolution, frame rate and caption approach on day one, and keep the key action away from the areas covered by the app interface.
- Name shots clearly:
scene01_shot01_block,scene01_shot01_anim,scene01_shot01_final. - Version instead of overwriting: add a version number each time you save a working file.
- Separate folders: rigs, textures, scene files, image sequences and edits.
The channels that last in this niche run repeatable formats. A fan-maintained list of the most subscribed Minecraft animators puts BigSchool at 32.7 million subscribers, Parotter at 17.6 million and Squared Media at 11.5 million, followed by PlataBush (10.9 million) and Haha Animations (10.6 million). The same list records Squared Media starting in 2008 and making its first Minecraft animation in 2015. For pacing and compositing ideas beyond game-specific tools, look at how motion graphics studios structure their work, then keep your own scene small.
How to pose and animate a Minecraft character
Convincing Minecraft animation comes from clear silhouettes and weight, not from keying every bone.
Block the major poses
For the walk-and-react scene, place rough keyframes at frames 0, 12, 24 and 36. These are checkpoints, not fixed rules:
- Frame 0: the walk and the direction of travel.
- Frame 12: the reaction begins, head or upper body leading.
- Frame 24: the peak of the turn.
- Frame 36: the character settles into the final pose.
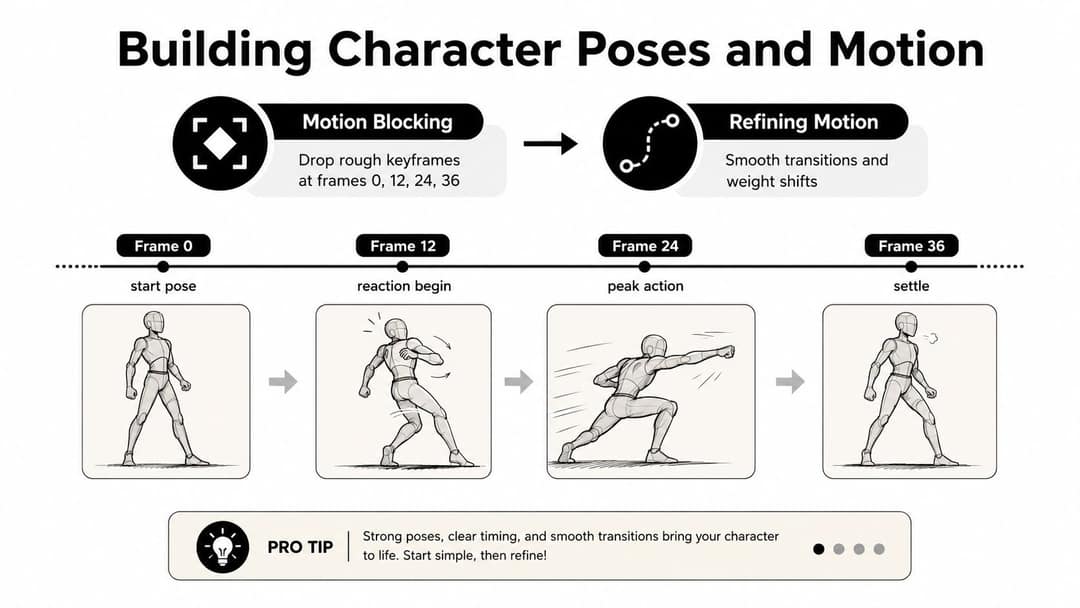
Judge each pose from the camera you will actually use. Check foot contact, counterbalance in the torso, and whether the gesture reads without facial detail. Stepped interpolation keeps blocking decisive; switch to spline once the poses work.
Set up a rig that supports the performance
A workable Minecraft rig has a root bone for global movement, a spine chain for weight, foot IK targets for stable contacts, arm controls for gestures, and face controls for panel-style expressions. Animate in this order:
- Lock foot contact and the hips.
- Add the spine and shoulders so the body carries weight.
- Place the head and arms to clarify the reaction.
- Add face changes only after the body reads.
- Refine the silhouette facing the camera.
Realism does not fit blocky proportions. Translate anticipation into a clear preparatory pose, squash into a short compression of the torso, and follow-through into a delayed head, hand or item movement.
Clean the motion instead of decorating it
After blocking, check the arcs of the head, hands and feet, remove jitter from competing keys, and play the shot at half speed. If it only looks right at full speed, the spacing or the poses need work.
In Bedrock, the engine resets the skeleton to its default pose at the start of each frame before applying animations, so the rig needs a clean default pose and transforms that do not fight each other, as this Bedrock animation workflow video demonstrates. Microsoft's Bedrock animation overview names rotation, position and scale as the transform channels and recommends keying only the bones that change.
For a sense of what a finished story animation looks like, watch this full example:
How to make animations in Minecraft Bedrock
A rendered animation plays because your editor shows frames in order. A Bedrock animation is a small runtime system with three layers:
- Animation file: the bone transforms for a clip such as
idleorwalk. - Client entity definition: registers the animations and controllers for the entity, then runs them through
scripts/animate. - Animation controller: a state machine that switches clips when conditions change.
Microsoft's Bedrock animation getting-started reference walks through this structure file by file.
Author the clip in Blockbench
- Create or open a Bedrock entity model and confirm the bone names.
- Key the rig on the timeline, only on the bones that move.
- Name clips by behavior (
idle,walk,attack), not by scene. - Set clips that should repeat to loop (
"loop": truein the animation file). - Export the animation into your resource pack.
Write the state machine
A minimal idle-to-walk controller uses a Molang movement query to switch states:
{
  "animation_controllers": {
    "controller.animation.my_mob.move": {
      "initial_state": "idle",
      "states": {
        "idle": {
          "animations": ["idle"],
          "transitions": [{ "walk": "query.is_moving" }]
        },
        "walk": {
          "animations": ["walk"],
          "transitions": [{ "idle": "!query.is_moving" }]
        }
      }
    }
  }
}Add the format_version line from Microsoft's reference at the top of the real file. Blend transitions can soften the switch, but they will not fix clips with mismatched timing or incompatible poses.
Fix the usual failures
- Clip plays once and stops: looping is not set.
- Nothing moves: bone names differ between the model and the animation.
- Controller ignored: it is not registered in the client entity file or not listed under
scripts/animate. - Old version still showing: reload the world after editing resource-pack files and confirm the pack is active.
- Poses drift: the rig's default pose is not clean.
This system is specific to Bedrock Edition; Java Edition does not use these files.
Render and edit your Minecraft animation for TikTok, Reels and Shorts
Animation ends at the render. The video still needs framing, sound, captions and pacing.
Render settings
Render an image sequence when you want compositing flexibility (a transparent character layer, a separate sky). Match resolution to the destination: 1080 x 1920 for vertical, 1080 x 1080 for square, 1920 x 1080 for landscape. Render at 30 fps: Instagram requires at least 30 FPS for Reels, and TikTok's upload API accepts 23 to 60 FPS. Use denoising if your samples are low, but inspect edges and dark areas before trusting it.
| Platform | Resolution | Aspect ratio | Length | Notes |
|---|---|---|---|---|
| TikTok | 1080 x 1920 | 9:16 | Uploads up to 60 minutes | 9:16 at 1080 x 1920 is TikTok's own recommendation |
| Instagram Reels | 1080 x 1920 | 9:16 | Up to 20 minutes | Reels over 3 minutes are not recommended to non-followers; minimum 30 FPS and 720 px |
| YouTube Shorts | 1080 x 1920 | 9:16 or square | Up to 3 minutes | Longer vertical videos are not Shorts |
| YouTube (landscape) | 1920 x 1080 | 16:9 | 15 minutes by default | Verified accounts can upload longer videos |
Export an MP4, the format TikTok recommends for uploads, then preview the file on a phone before posting.
Make the first moment readable
Open with Steve already moving, use the creeper hiss as the trigger, and push closer as the reaction starts. A wide shot sets geography, a medium carries the turn, a close-up delivers the reveal. Start with shots of 3 to 5 seconds and adjust: a shot can run longer if the pose keeps changing, and fast cuts feel empty when each shows the same information.
Length matters less than pacing. In Revid's analysis of 176,367 TikToks with 1,000+ likes posted between October 2025 and October 2026, every length bucket from under 15 seconds to 10 minutes had a median between 58K and 76K views (what makes a TikTok go viral). The sample only includes videos that already passed 1,000 likes, so read it as "length is not the lever", not as a target. Our guide to social media video length covers duration per platform.
Sound, captions and safe zones
Sound often sells a reaction before the pose does, so place the trigger effect a beat before the turn. Layer the effect, an ambient bed, footsteps and music, and duck the music under any voice-over. Add burned-in captions with a caption generator, and check them against the TikTok safe zone so buttons do not cover text or faces.
For a broader editing checklist, see this guide to video editing for social media from WaveGen. To reuse one master render, leave extra background space around the action and resize the video into square or vertical cuts before re-rendering anything.
Make a Minecraft video with Revid without keyframing
If you want a narrated Minecraft story video rather than frame-by-frame animation, Revid's Minecraft video generator builds one from a script or an idea:
- Open the tool and paste your script or a one-line idea (the creeper scene works).
- Choose a voice and a caption style; voice-overs are available in 70+ languages.
- Review the generated scenes in the timeline editor and replace any that miss.
- Export at 720p, 1080p or 4K, or publish directly to TikTok, Instagram or YouTube.
It is AI generation, so it will not give you Blender's frame-level control; use it to test story ideas fast or run a regular series. For narrated text over gameplay instead, the Minecraft parkour video generator reads your text over parkour footage. Sign-up is free and new accounts get free credits to try video creation, no credit card needed; regular creation then uses plan credits, with plans from $39/month. For more cinematic AI styles, see how to create a cinematic video with Revid.
FAQ
What is the easiest Minecraft animation maker for beginners?
Mine-imator is the easiest place to start because it ships with Minecraft-style assets and a simple render workflow. Move to Blender when you need custom rigs, advanced lighting or complex camera moves.
Is Blender free for making Minecraft animations?
Yes, Blender is free and open source. You still need a Minecraft character model and rig to import, which takes more setup than Mine-imator.
What frame rate should a Minecraft animation be?
Render at 30 fps for social video. Instagram requires at least 30 FPS for Reels, and TikTok's upload API accepts 23 to 60 FPS, so 30 fps works everywhere.
Can I make Minecraft animations in Java Edition?
For rendered videos, the edition does not matter, because Mine-imator and Blender work outside the game. In-game custom entity animations with Blockbench files and animation controllers are a Bedrock Edition system.
Can I make a Minecraft animation without animating by hand?
Yes. An AI tool like Revid's Minecraft video generator turns a script into a narrated video with visuals, captions and music, which you can edit and publish. It trades frame-level control for speed.